Author: Devika R
April 30, 2026
10 min read
Scan-to-BIM is not “import and click”—it is careful scan planning in the field, clean and registered point clouds, and disciplined Revit modeling so that site reality becomes a coordinated BIM model your team can document, share, and build from with confidence.
At BIM Cafe Learning Hub, we recently completed a real Scan-to-BIM project in Kerala, where an existing building and its surrounding site were captured using LiDAR technology and converted into an accurate BIM model.
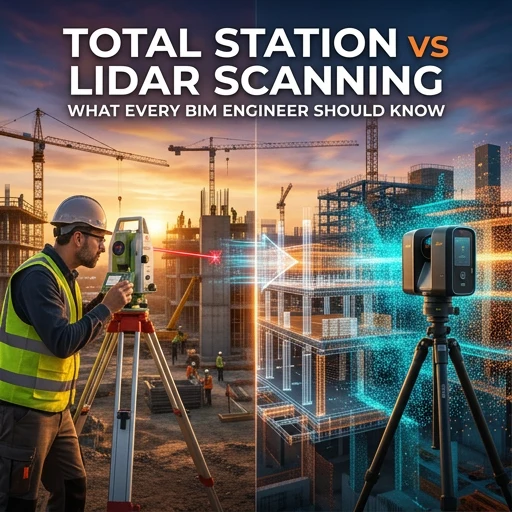
This project was not just about scanning a structure—it was about understanding how real-world site data translates into coordinated BIM workflows. If you are comparing capture options, our guide on total station vs LiDAR for BIM engineers explains where each method fits before you commit to hardware and scan plans.
For many teams, Scan-to-BIM sounds straightforward. Once you step onto the site, deal with real conditions, and work with raw scan data, the level of precision and decision-making becomes obvious—similar to the workflow ideas we outline in the Scan-to-BIM process explained.
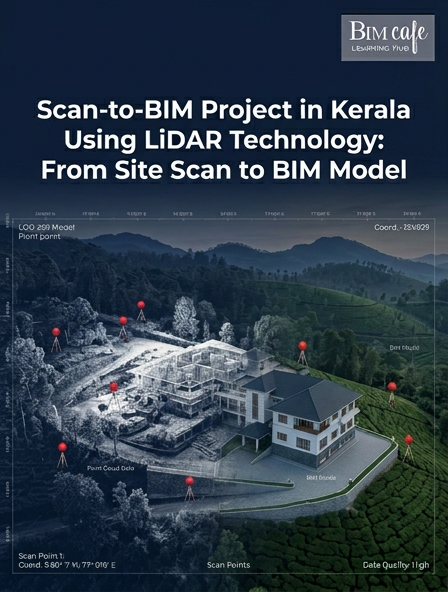
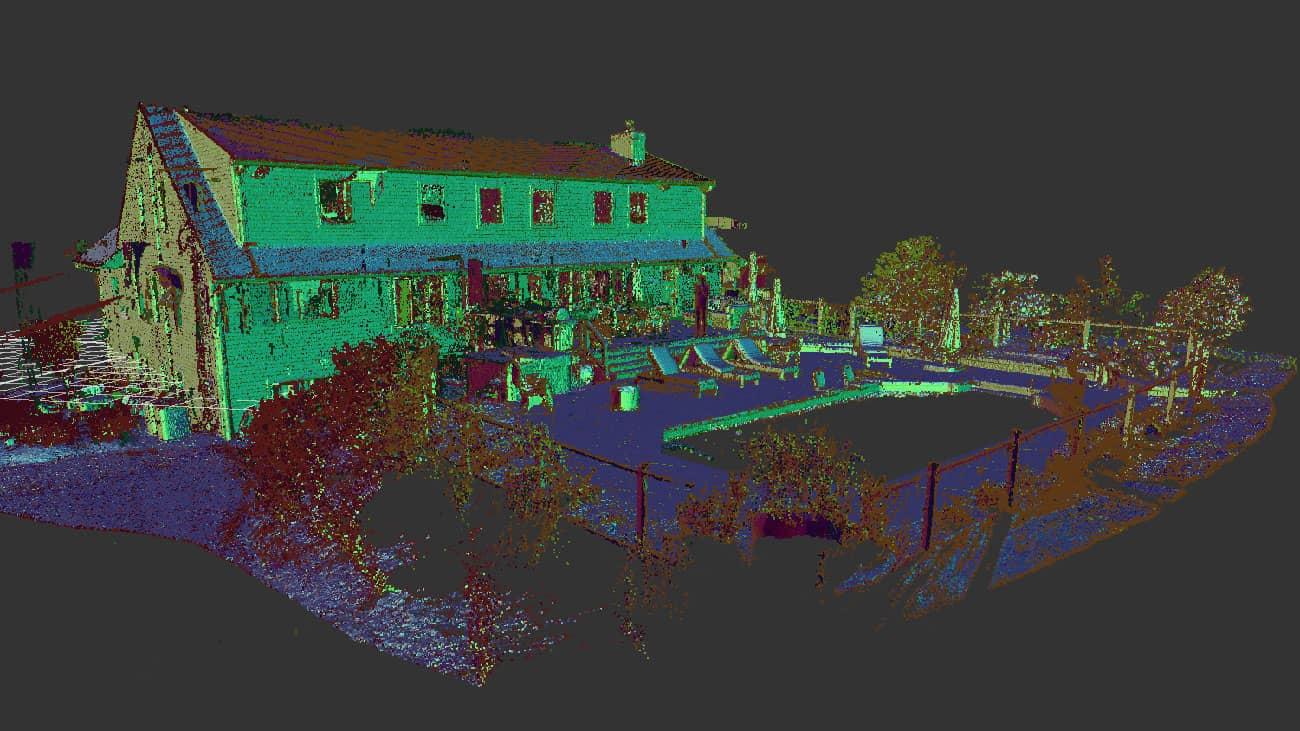
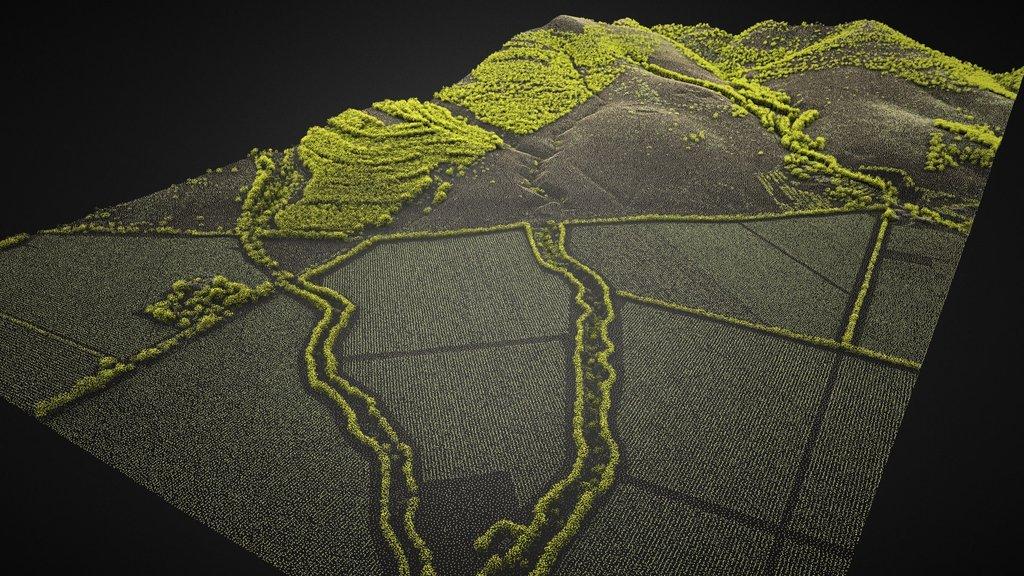
1. Scan location: Kuttikanam, a complex natural site
This project was carried out in the serene landscape of Kuttikanam, where natural terrain, dense vegetation, and varying ground levels added complexity to the scanning process. The building sits within a lush environment, which made it essential to plan scan positions carefully to avoid occlusions caused by trees and uneven ground. That site context also matters later when the model is used for renovation coordination—see how delivery connects end-to-end in how a real BIM project works from design model to construction site.
Coverage map, processed plan view, and full 3D point cloud from the same Kuttikanam capture.
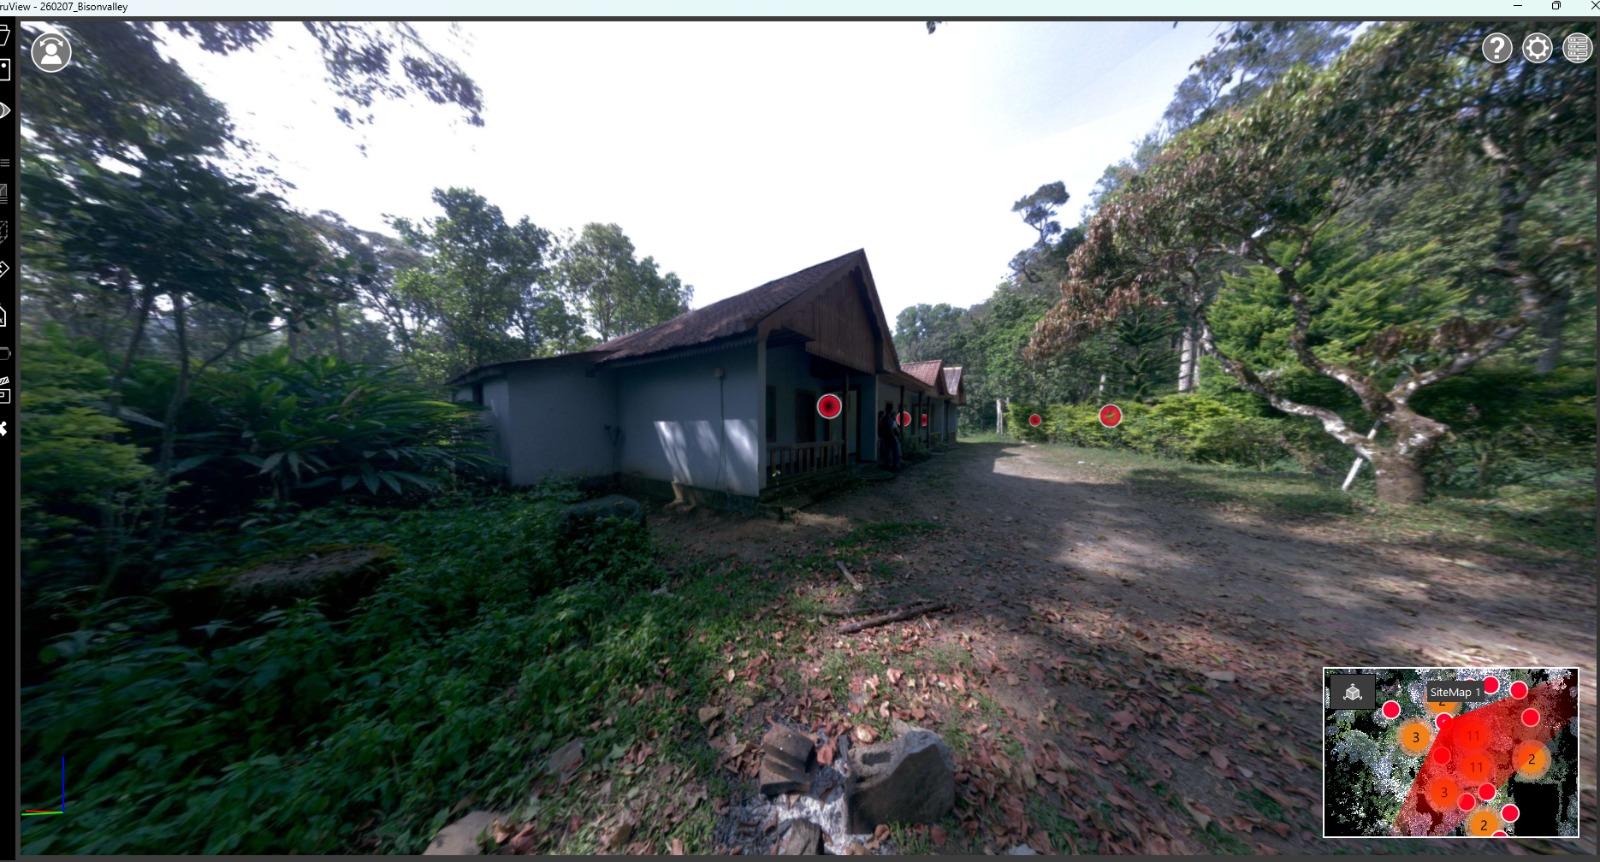
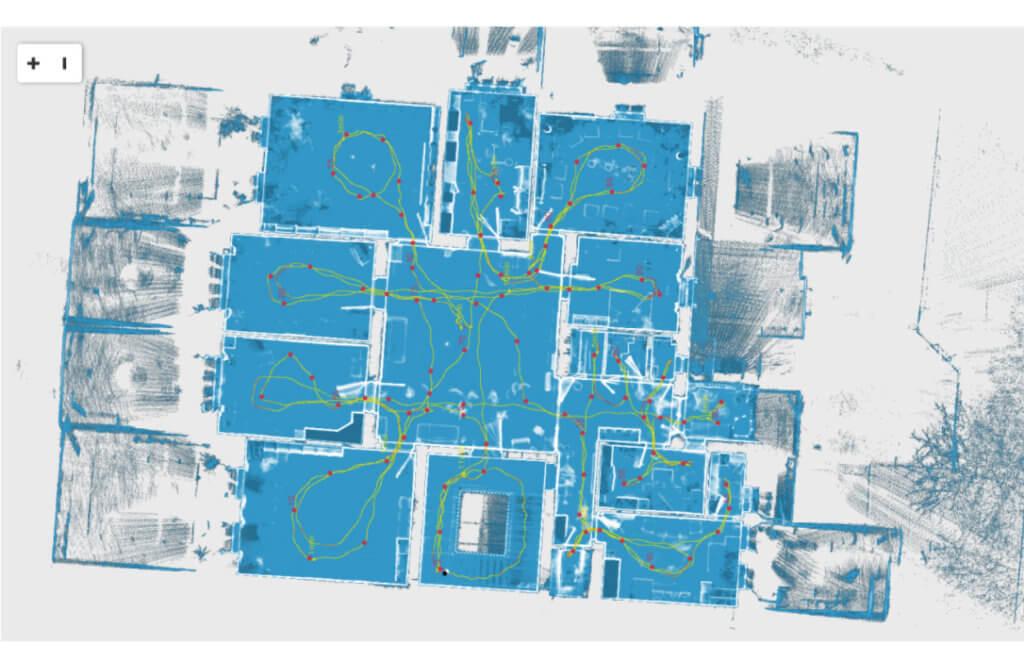
2. Site data capture using a terrestrial LiDAR scanner
The first step was capturing the entire building and site using a terrestrial LiDAR scanner. Instead of relying on manual measurements alone, the scanner collected millions of data points by emitting laser pulses and recording their return distances. To ensure complete coverage, multiple scan positions were strategically placed around the building—capturing not just the structure, but surrounding elements like vegetation, pathways, and terrain variations that traditional surveys often underserve when the goal is a model-ready dataset.
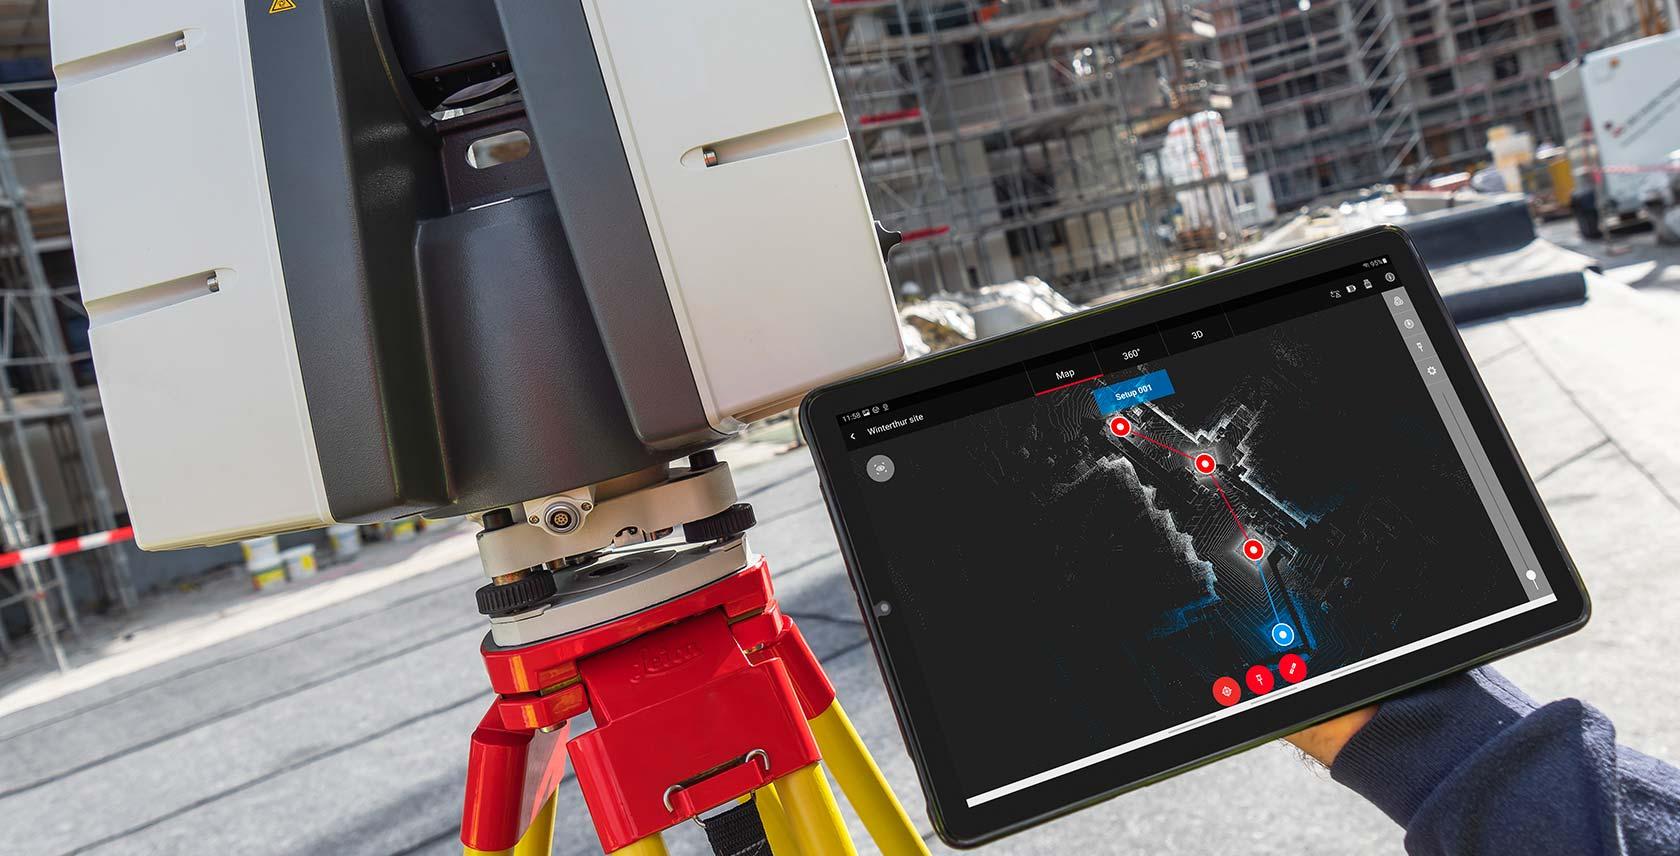
LiDAR scan positions captured around the building to ensure full site coverage—structure, vegetation, pathways, and terrain variations.
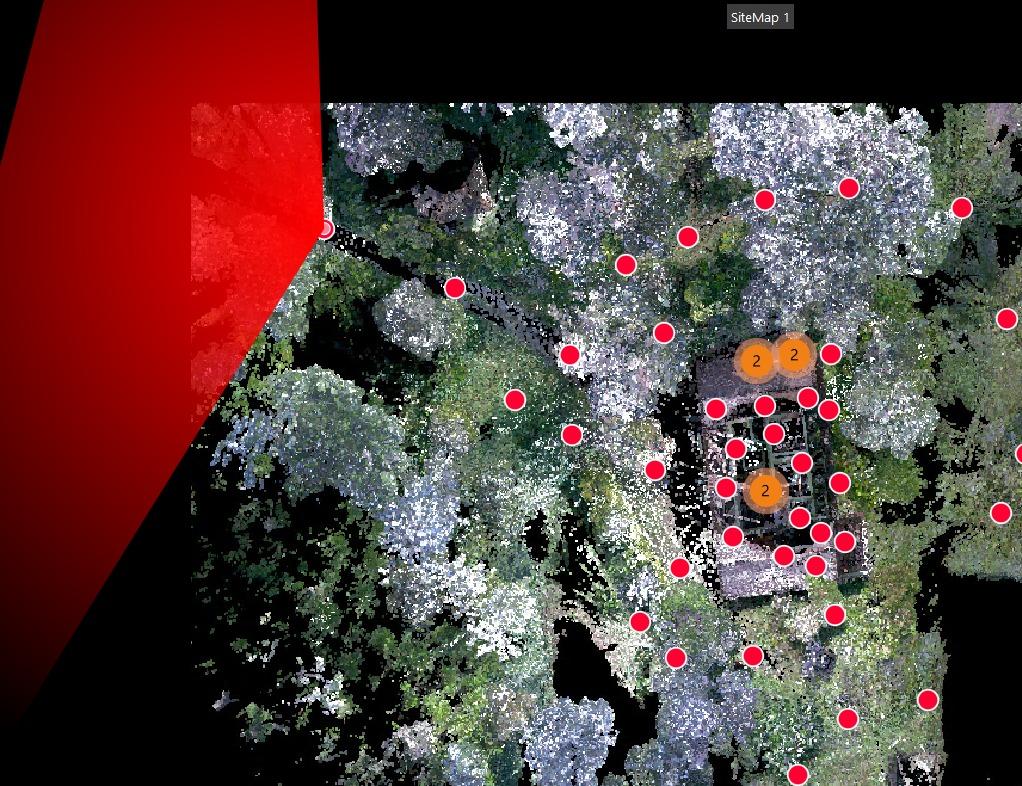
3. Scan coverage strategy (why planning matters)
One of the most important aspects of LiDAR scanning is scan planning. Each scan position captures only a portion of the site; those datasets are later combined into one usable point cloud. Poor coverage creates gaps that show up late in modeling. Strong planning keeps registration cleaner and reduces rework when the point cloud becomes the reference for walls, levels, and openings in Revit.
Multiple scan positions used to ensure complete coverage and minimize data gaps.
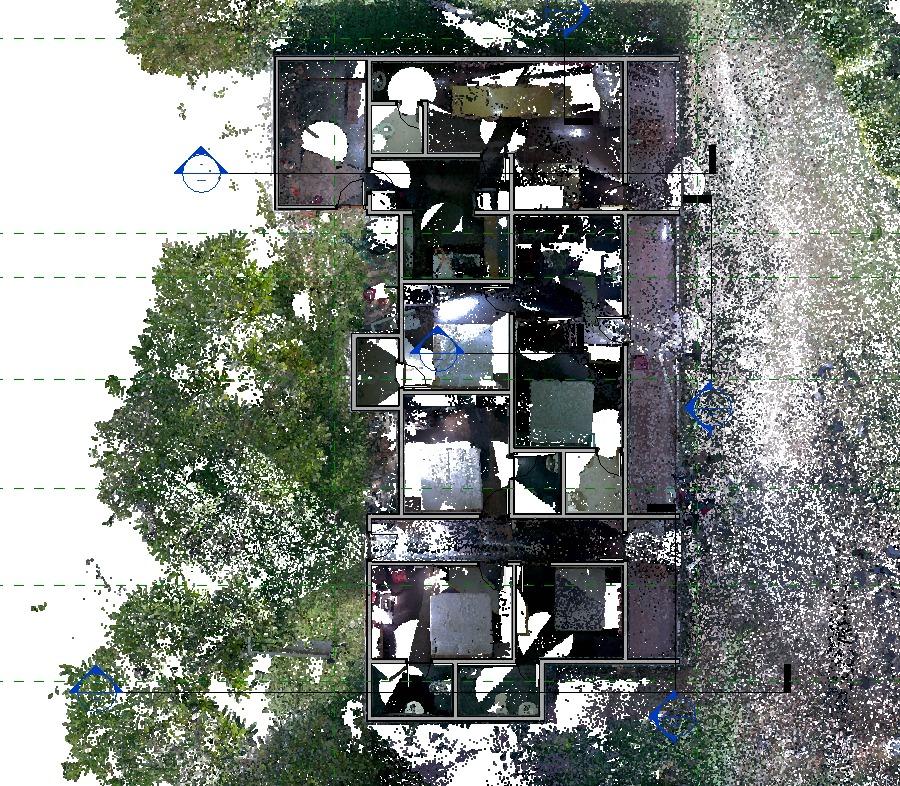
4. Point cloud data processing
After scanning, the raw data was processed to create a structured point cloud dataset. Processing involves aligning multiple scans through registration, removing noise and unwanted elements, and structuring the data for modeling. At this stage, the building starts becoming clearly visible in digital form—with trustworthy geometry and spatial relationships, setting the base for coordination and clash workflows once the BIM model is federated with other disciplines.
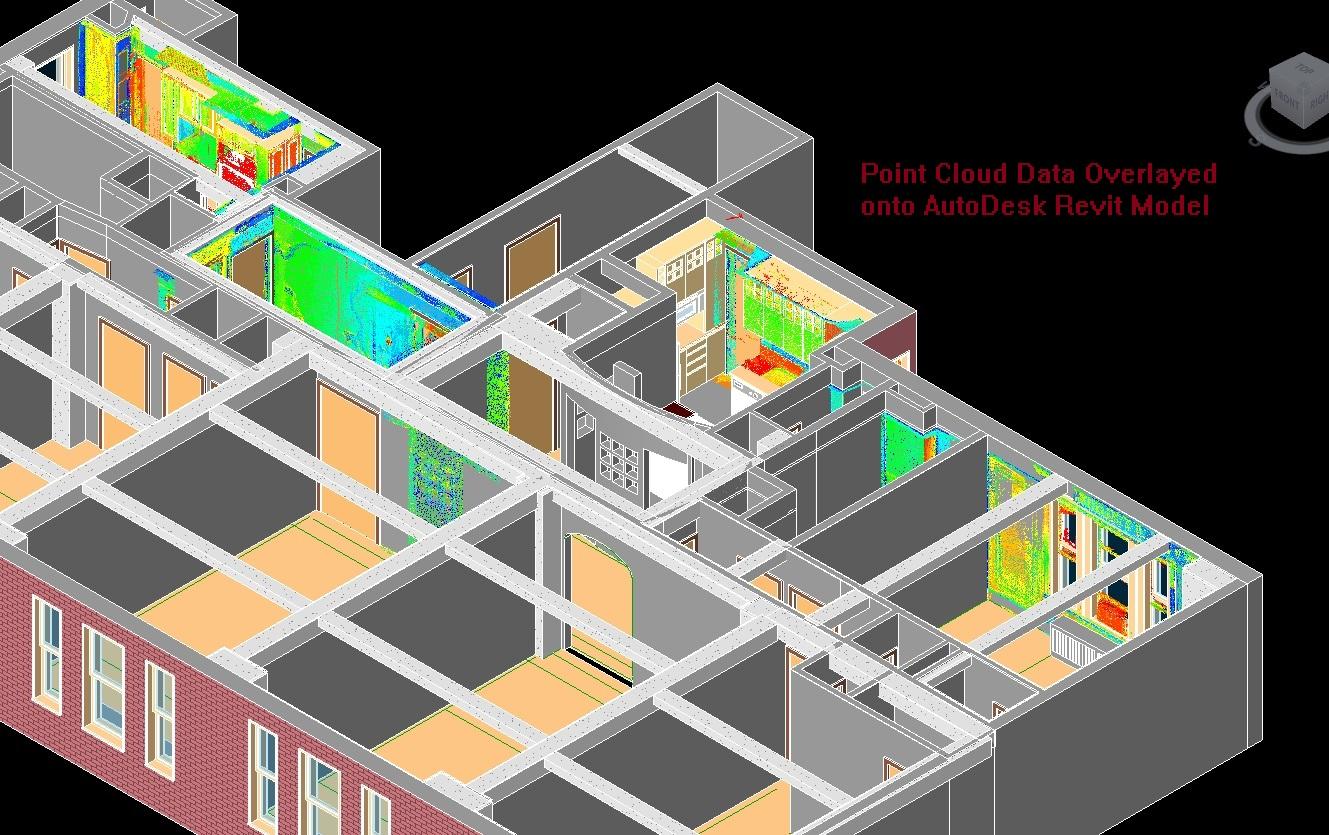
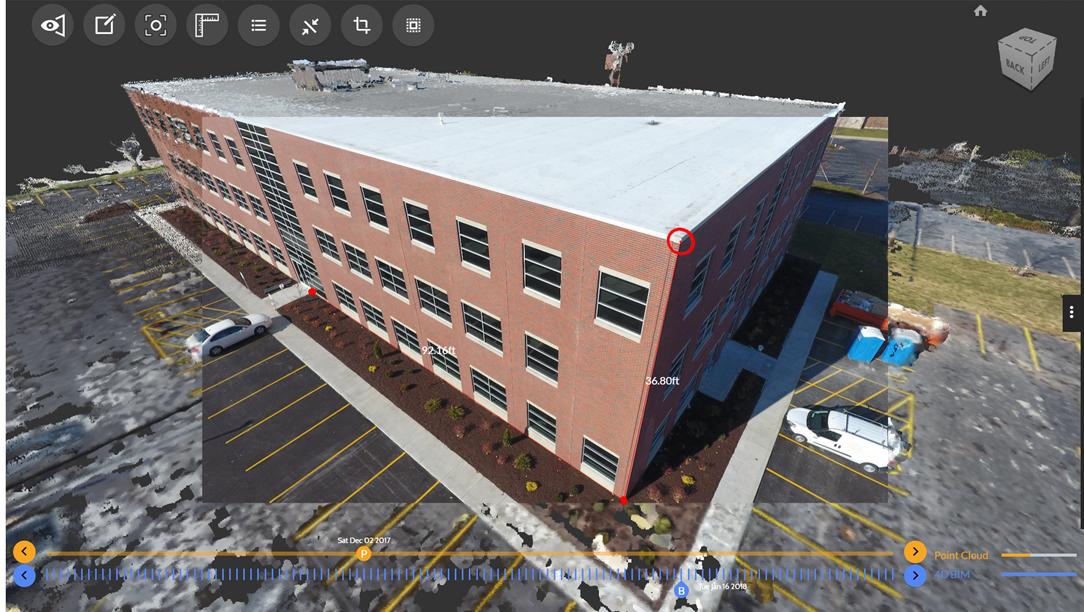
Processed point cloud aligned and structured for BIM modeling.
A dense point cloud does not automatically become a perfect BIM model. Registration quality, scan shadows, and modeling standards still decide whether your deliverables are contractor-ready.
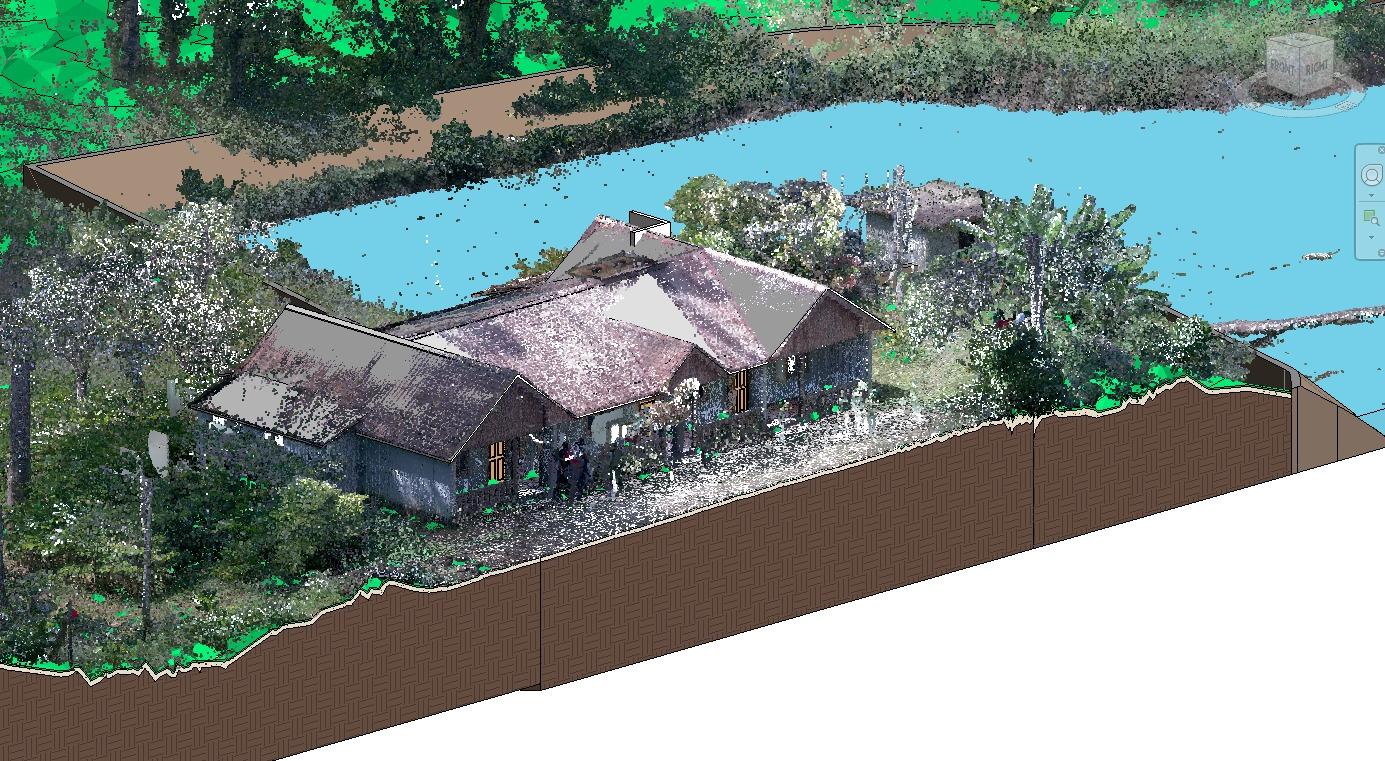
5. Site context and 3D environment
One of the biggest advantages of LiDAR scanning is the ability to capture the entire environment, not just the building. In this project, the scan captured terrain levels, trees and vegetation, and pathways and external areas—which makes the BIM model more than just a building. It becomes context-aware, which is critical for renovation, expansion, and stakeholder communication.
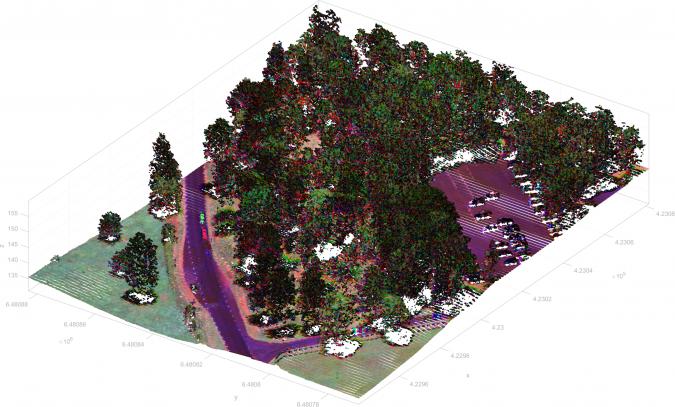
3D point cloud capturing building geometry along with surrounding terrain and vegetation.
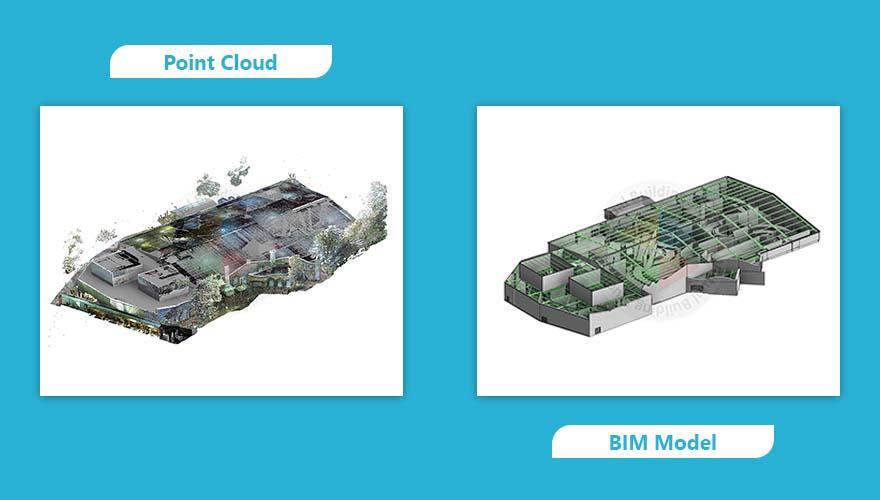
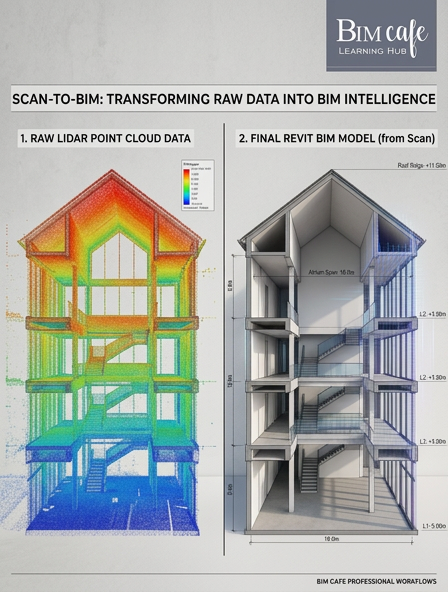
6. Scan-to-BIM modeling in Revit
Once the point cloud was ready, it was used to create a 3D BIM model in Revit. Our BIM partner DDG converted the scanned data into structured building elements—walls and partitions, doors and windows, floor levels, roof structure, and structural elements. This is where interpretation plays a major role. A point cloud is just data; turning it into a usable BIM model requires experience, accuracy, and decision-making about tolerances, LOD, and what to model versus what to leave as context.
7. Sheet extraction and documentation
From the BIM model, we generated technical drawings and documentation including floor plans, elevations, sections, and measurement details. Instead of manual drafting, all drawings are derived directly from the model—ensuring consistency and accuracy as the model evolves.
Benefits of Scan-to-BIM from this project
Working on this project highlighted several practical advantages:
- High accuracy compared to traditional surveying for complex existing conditions.
- Faster data capture on site when scan positions are planned for coverage.
- Reliable base for renovation and retrofit work.
- Improved coordination between stakeholders referencing the same digital twin of the site.
For existing buildings—especially older structures—this workflow is becoming essential.
Where this workflow is used
Scan-to-BIM is widely applied across:
- Renovation and retrofit projects
- Heritage building documentation
- Facility management
- Infrastructure upgrades
As BIM adoption grows in India and the Gulf, this workflow is becoming a standard expectation, not an optional add-on.
From site data to coordinated BIM
What this project clearly shows is that BIM doesn’t start in software—it starts on site. The accuracy of LiDAR scans, survey inputs, and site data directly impacts the quality of the BIM model. Professionals who understand this connection between real-world data and digital modeling are the ones who perform better on real projects.
Conclusion
This workflow demonstrates how LiDAR scanning and BIM come together to create a powerful and reliable process. It’s not just about creating a model—it’s about creating a reliable digital representation of reality. As the industry moves toward data-driven construction, Scan-to-BIM will continue to play a critical role in how existing buildings, sites, and infrastructure enter coordinated digital workflows.
Frequently Asked Questions
What is Scan-to-BIM?
A workflow that turns reality capture—such as LiDAR point clouds—into a structured BIM model for design, documentation, and coordination.
Why use LiDAR for an existing building?
LiDAR captures dense 3D geometry quickly, which helps document complex as-built conditions and reduces gaps compared with sparse manual measurements alone.
How is a point cloud converted into a Revit model?
After registration and cleanup, modelers interpret the scan to create walls, openings, levels, and systems in Revit—following project LOD and accuracy requirements.
What deliverables can Scan-to-BIM produce?
Common outputs include a coordinated 3D model, plans, elevations, sections, and quantities—derived from the model so updates stay consistent.
Premium BIM Course
Professional BIM Course
Master BIM Course
Structural Design Concepts and BIM
Revit MEPF Master Course
Certified MEPF BIM Master Course
Electrical BIM Professional Program
RenderLab – Master 3D Modeling & Photorealistic Rendering
Multi-Tool Mastery for Architects & Engineers
BIM Coordinator Workflow Program
BIM FastTrack – 30 Day Intensive Training
Global Architectural & Structural BIM Project Program