Author: Devika R
April 7, 2026
14 min read
Most BIM projects on Gulf construction sites rely heavily on Navisworks clash detection. Catching a duct running through a structural beam in the model costs nothing to fix. Catching it on site after concrete is poured costs weeks and serious money.
Navisworks Manage helps identify these conflicts before they become site problems — and the BIM Coordinator handling clash detection plays a critical role in project coordination.
This guide walks you through exactly how clash detection works — from exporting your Revit models to generating a professional clash report — with the same workflow used on UAE and Qatar projects right now.
What Is Navisworks Manage?
Navisworks Manage is Autodesk’s project review and coordination software. Its core function is combining models from multiple disciplines — architecture, structure, MEP — into a single federated model, then running automated checks to find where those models conflict with each other.
That conflict-finding process is called clash detection, and the tool inside Navisworks that runs it is called Clash Detective. If you are evaluating coordination tools, see our Revizto vs Navisworks comparison for a side-by-side breakdown.
| Version | Clash Detective | 4D Simulation | Use Case |
|---|---|---|---|
| Navisworks Freedom | ❌ No | ❌ No | View-only, free |
| Navisworks Simulate | ❌ No | ✅ Yes | 4D timeline only — no clash detection |
| Navisworks Manage | ✅ Yes | ✅ Yes | Full coordination — what you need |
Why Gulf Projects Mandate Clash Detection
On UAE, Qatar, and Saudi Arabia construction projects, the BIM Execution Plan (BEP) — the document that governs how BIM is delivered on a project — typically requires:
- Weekly clash detection reports submitted to the BIM Manager
- Zero unresolved hard clashes before the model is issued for construction
- Documented resolution for every clash marked as “Reviewed” or “Approved”
This is not optional. Gulf employers expect engineers to open Navisworks, run a clash test, and produce a formatted report without being shown how. If you cannot demonstrate this in a technical interview, you will not get shortlisted for BIM coordination roles.
What You Need Before You Start
- Navisworks Manage installed (not Freedom or Simulate)
- NWC files exported from each discipline’s Revit model — at minimum, one MEP model and one Structural model
- Shared coordinates set up correctly in Revit, so models align when combined
The 8-Step Clash Detection Workflow
Step 01: Export Your Revit Models to NWC Format
NWC (Navisworks Cache) is the file format Navisworks uses. Unlike NWD files, NWC files stay live-linked to the Revit source — every time Revit re-exports, Navisworks picks up the latest version automatically. This is critical for active coordination when models are changing daily.
- Open the Revit discipline model (e.g., Revit MEP)
- Go to Add-Ins tab → External Tools → Navisworks 2026 (install the free exporter from Autodesk if not visible)
- In the export dialog, select Entire Project and format as NWC
- Name the file clearly:
MEP_Floor3_Kochi_Hospital.nwc— Save to a shared coordination folder - Repeat for every discipline: Architecture, Structure, MEP (and sub-disciplines if HVAC, Electrical, Plumbing are separate models)
| Format | When to Use |
|---|---|
| NWC | During active coordination. Live-linked, always shows the latest Revit export. Cannot be shared externally without Navisworks installed. |
| NWD | Formal submissions, client reviews, or archiving a coordination snapshot. Standalone file — viewable with Navisworks Freedom. |
Step 02: Create a Federated Model in Navisworks
Open Navisworks Manage. You are starting with an empty scene.
- Go to Home tab → click Append (not Open — Open replaces the scene; Append adds to it)
- Select your MEP NWC file → Open
- Click Append again → select the Structural NWC file
- Click Append again → select the Architectural NWC file
- All three models should now appear together in the viewport
Step 03: Set Up Clash Detective
Open Clash Detective: Home tab → Clash Detective, or use the keyboard shortcut Ctrl + Shift + C.
Click Add Test to create your first clash test. Rename it clearly — use a naming convention like MEP vs Structure or HVAC vs Structural Steel. You will see two selection panels: Selection A and Selection B.
Setting Selection A and Selection B:
- Selection A → in the Selection Tree (left panel), expand your model hierarchy → tick the MEP model
- Selection B → in the Selection Tree, tick the Structural model
Best practice: Use Selection Sets for recurring tests. Create named sets (e.g., “HVAC Ductwork”, “Electrical Cable Trays”, “Structural Steel”) and select those instead of entire models. This makes targeted retesting faster after model updates. For a deeper look at how disciplines interact, read Architectural vs Structural vs MEP: Understanding Building Systems.
Step 04: Configure Clash Settings
Before running, configure the clash type. Start with Hard. Fix all hard clashes first, then run Clearance checks with a tolerance appropriate to your project.
| Clash Type | What It Finds | When to Use |
|---|---|---|
| Hard | Objects that physically intersect | Primary coordination — use this first |
| Hard (Conservative) | Same as Hard, but more sensitive | When you want to catch near-misses |
| Clearance | Objects within a specified distance | Maintenance access checks, insulation allowances |
| Duplicate | Identical geometry in the same location | Quality checks for duplicate elements |
Step 05: Run the Clash Test
Click Run Test to run the selected test, or Run All to run all tests simultaneously. Navisworks processes the geometry of every element in Selection A against every element in Selection B. To understand how this step fits into a full project lifecycle, see How a Real BIM Project Works.
What to expect on a first run:
| Scenario | Expected Clash Count |
|---|---|
| Raw first run, no prior coordination | 500 – 2,000+ clashes (do not panic) |
| First run after basic Revit coordination | 100 – 400 clashes |
| Target for issue-for-construction | 0 unresolved hard clashes |
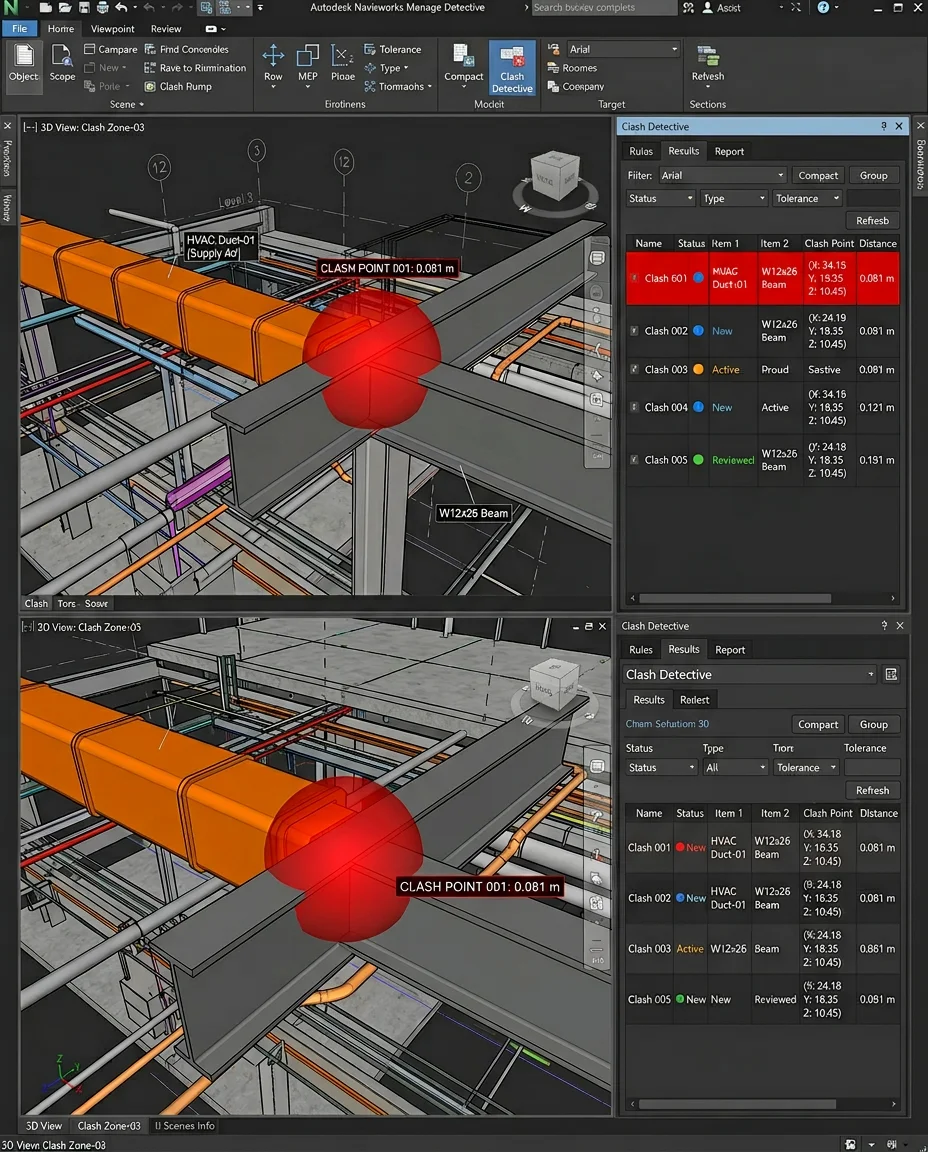
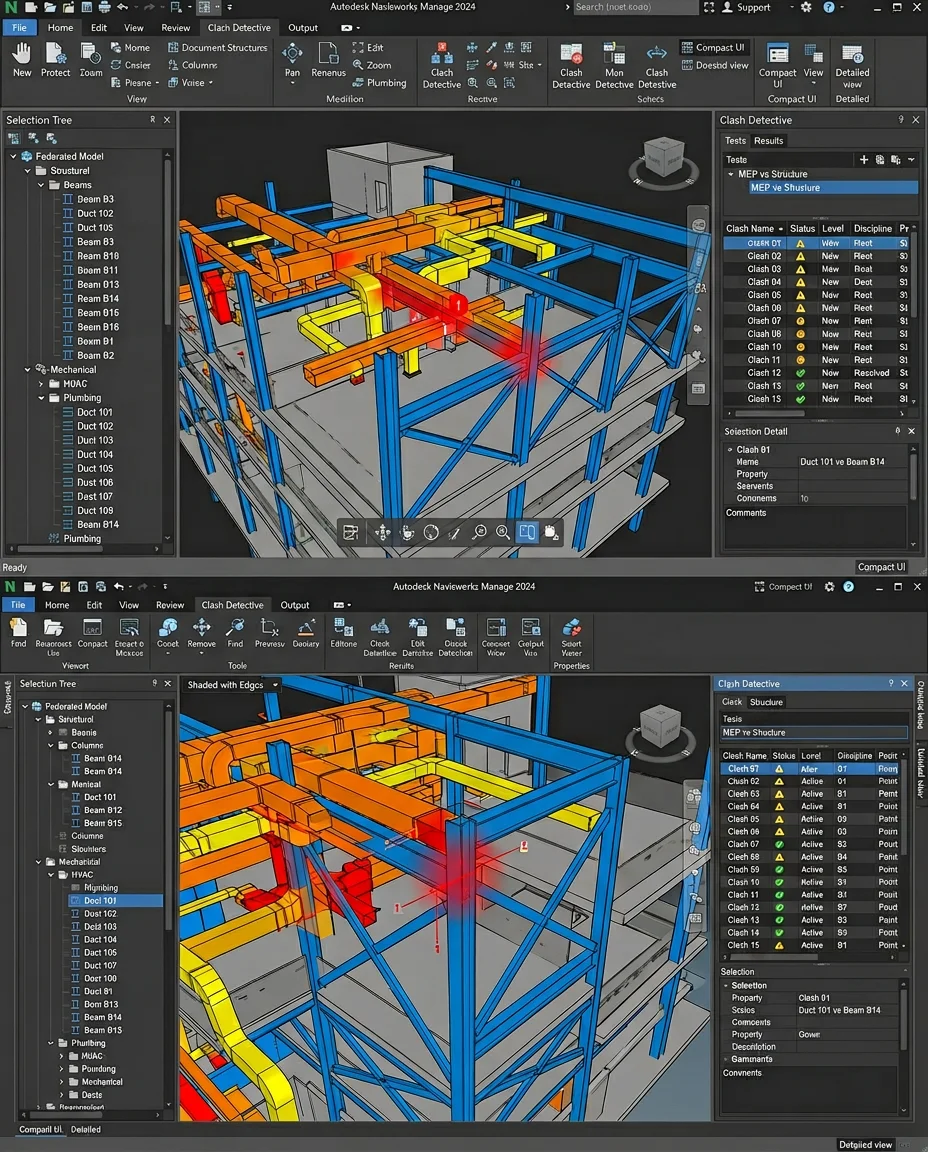
Step 06: Review and Manage Clash Results
After the test runs, the results list populates. Each row is one clash. Click any clash to zoom the viewport to that location and highlight the two clashing elements.
| Status | What It Means | Your Action |
|---|---|---|
| New | Just found, not yet reviewed | Open it, assign to the responsible engineer |
| Active | Being worked on — resolution in progress | Track, follow up |
| Reviewed | Intentionally accepted (e.g., acceptable software overlap) | Document the reason clearly |
| Approved | Formally signed off by the BIM Manager | No further action |
| Resolved | Fixed in the Revit model | Re-run and confirm resolution |
Sort by Status: New first. Group by Assigned To if your team is working through them in parallel. Use the Comments field on each clash to write what the conflict is and what resolution has been agreed upon.
Step 07: Add Comments and Assign Clashes
For every unresolved clash, document three things:
- Assignment: The name or discipline responsible
Example: “MEP Team — Revit update required” - Comment: What the clash is and the agreed resolution
Example: “HVAC duct running through 300mm structural beam. MEP to re-route above. Confirmed with structural engineer 04/04/26.” - Due Date: When the resolution should be completed
These comments are preserved in the clash report and form a coordination audit trail reviewed by project engineers and QA teams. This level of documentation is one of the top skills Gulf employers evaluate during interviews.
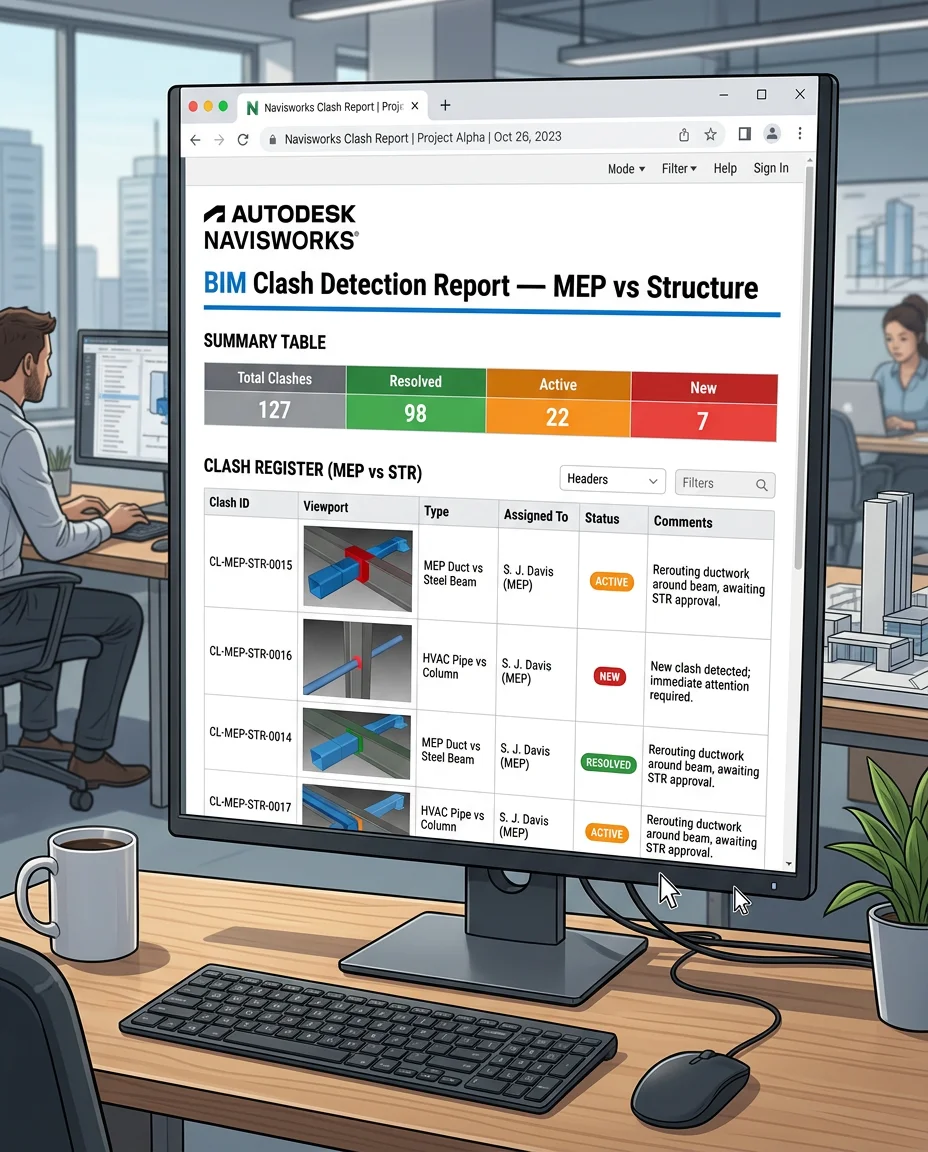
Step 08: Export the Clash Detection Report
The clash report is a formal project deliverable on BIM-mandated Gulf projects.
- In Clash Detective, click Report (bottom left of the panel)
- Format: HTML for a readable report you can email or share. XML for integration with project management systems. Viewpoint Report if you need screenshots embedded.
- Scope: Select Current Test to report on one test, or All Tests for a combined report
- Content to include: Status filter (New + Active + Reviewed), screenshots of each clash, assigned engineer name, and comments
- Click Write Report → choose your save location
- Project name and date
- Model versions referenced
- Total clashes found / resolved / open
- Status breakdown table
- Individual clash listings with screenshots, assignments, and comments
Submit to the BIM Manager each coordination cycle (typically weekly). These reports also become a key part of your BIM placement portfolio.
Clash Detection Best Practices for Gulf Projects
These are the practices that separate an engineer who ran Navisworks once from a BIM Coordinator that Gulf employers want to hire.
Run Tests on a Fixed Schedule
Weekly is standard on active coordination projects. Ad-hoc testing — when you feel like it — produces inconsistent coordination records.
Coordinate in Revit First, Then Clash in Navisworks
Before running Navisworks, do a visual check of your Revit MEP model against the linked structural model. Obvious route conflicts can be fixed in 20 minutes in Revit and will never appear in the Navisworks report. Save Navisworks for the conflicts you cannot see visually. If you work in Revit daily, keep these essential Revit shortcuts at hand.
Use Selection Sets for Targeted Tests
Instead of MEP (everything) vs Structure (everything), create tests like:
- HVAC Ductwork vs Structural Steel
- Electrical Cable Trays vs Structural Beams
- Plumbing Mains vs Structure
Smaller, targeted tests run faster and produce more actionable results. Understanding the difference between MEP Design and MEP BIM helps you set up the right Selection Sets from the start.
Document Every Reviewed Clash with a Reason
Gulf project auditors will read your coordination record. A clash marked “Reviewed” with no comment creates a compliance problem. Always write why it was accepted.
Re-run After Every Model Update
A resolved clash in week 3 can reappear in week 4 if the structural engineer moved a beam or the MEP engineer revised a duct route. Re-run your full test suite after every discipline model update.
Version Your NWD Snapshots
At the end of each coordination cycle, save an NWD snapshot named with the date:
MEP_vs_Structure_Coordination_2026-04-06.nwd
This creates a coordination history if questions arise about what was resolved and when. Proper BIM data management makes this audit trail reliable.
Navisworks Shortcuts Every BIM Engineer Should Know
| Shortcut | Action |
|---|---|
| Ctrl + Shift + C | Open Clash Detective |
| F4 | Toggle Selection Tree |
| F2 | Toggle Properties Panel |
| Ctrl + A | Select all visible elements |
| Spacebar | Toggle Walk navigation mode |
| Scroll Wheel | Zoom in / out |
| Middle Mouse Button | Pan the view |
| Shift + Middle Mouse | Orbit (rotate) the view |
| Ctrl + Z | Undo last selection action |
| Home | Reset view to fit all |
Frequently Asked Questions
Yes. Navisworks Manage imports DWG, DGN, DXF, IFC, SKP, RVT, NWC, and many other formats. IFC is particularly important — it is the open BIM format used when disciplines are working in different software (e.g., architecture in ArchiCAD, structure in Tekla). Navisworks can federate and clash IFC models the same way it handles RVT exports. Learn more about cross-platform workflows in our OpenBIM case study.
On a medium-sized commercial building (8,000–15,000 sqm) with no prior coordination, 500–1,500 clashes on the first Navisworks run are common and expected. Do not be alarmed — a large first-run count just means coordination has not started yet. Well-run coordination processes typically close 80–90% of clashes within the first two or three weekly cycles.
A federated model is the combined multi-discipline model you create in Navisworks by appending NWC files from each discipline (architecture, structure, MEP). The original Revit files remain separate — Navisworks references them rather than merging them. This means each discipline team can keep working on their own Revit model independently, and the federated model in Navisworks always reflects the latest version when NWC files are re-exported. For more on how disciplines coordinate, see Spatial Coordination with BIM.
Ready to Learn Navisworks Clash Detection the Right Way?
BIM Cafe Learning Hub in Kochi is Kerala’s Autodesk Authorised Training Centre.
Our Revit MEP and BIM Coordinator programmes include hands-on Navisworks training with portfolio-ready clash reports.